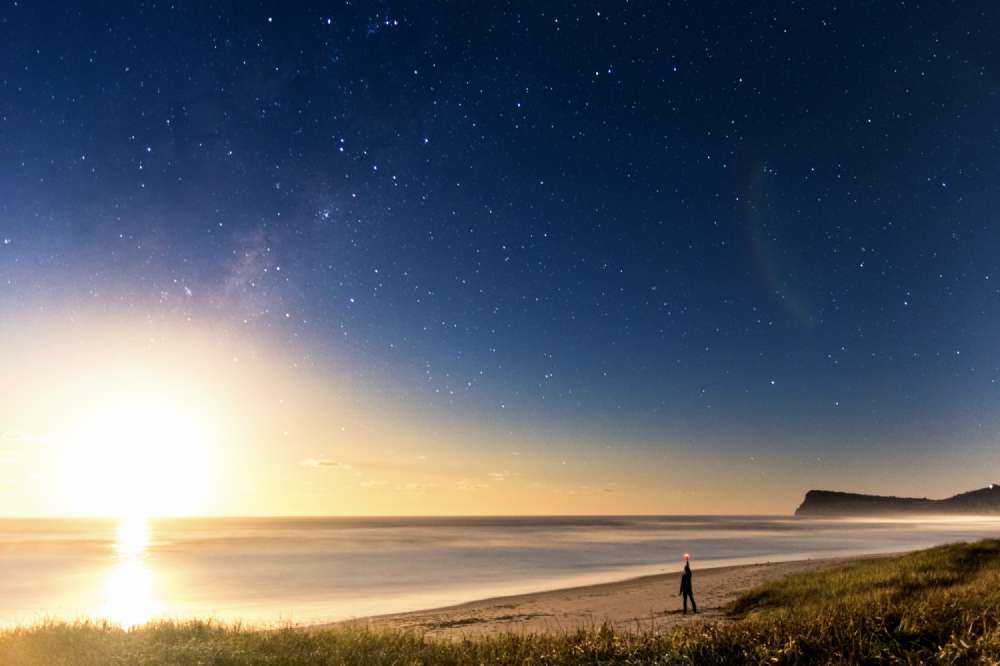
Back in May last year I took this photo and shared it on instagram and facebook. It generated a bit of buzz and the story behind it was later shared on PetaPixel. In this tutorial I'll reveal how I went about capturing this image. This is no photoshop trick, it is a single exposure.

Patience
The trick to capturing this photo is patience. Sure I could take two separate photos, one at sunrise and another at night and merge them together, but where would be the fun in that?
It's a little bit deceptive to call this photo day and night because the 'sun' in the photo is actually the moon. Moonrise is an ideal time to take this type of image because the moon is not bright enough to wash the stars out completely but still provides plenty of reflected warmth from the sun. This image was taken when the moon was about 3/4 full. The hard part is waiting. Trying to get a night with no clouds AND a moonrise is tricky and you may have to wait weeks (if not months) for the perfect opportunity. Patience is the name of the game.
The night I took this photo, I was planning on creating milky way images while using the light from the moon to 'paint' my foreground elements. I accidentally discovered the moon looked like the sun in one of my photos so I changed tactic and tried this shot.
Setup
I knew when I was taking this photo, that I wanted to be in it. I didn't really expect to get anything very good out of it, so I figured I'd go for something that would be instagram fodder. Now a normal person might have used a remote or something to take the photo once they were in position. I didn't do that (mainly because I don't have a remote).
Instead, I had to run to beat my 10 second timer. Although the distance from the camera to my position is only about 20m in a straight line. I couldn't actually run that way. There's a small fence that protects the dunes (that you can't see here) that prevented that. Instead I had to run down a track out of frame on the left, sprint over to my position and calm myself enough so that I didn't wobble during the exposure.
It wasn't particularly easy. It was dark, I was sprinting and I didn't know where I had to stand. I also had to stay still for 30 seconds but I didn't know when the camera had started or when it ended. It took multiple trial and error attempts till I got a shot I was happy with.
Camera settings
As I've already hinted at, my camera was set for a 30 second exposure. Generally for astro photography a good starting point is an aperture of f2.8 (or as fast as you can go), 15 second exposure and ISO of 800-1600. It's pretty hard to know in advance what is going the be the right settings until you take a test shot. If it comes out too dark, you can bump the ISO or shoot a longer exposure.
I usually opt for a longer exposure over bumping the ISO, even though I know it will start to introduce motion blur in the stars overhead. The reason I do this is because I know if I bump my ISO too far, the stars will start to blend into the noise. That being said, you can worry too much about noise. Most modern DSLRs are much better at handling high ISOs than the 5 year old body I was using here. If I had been using a newer camera I would have undoubtedly bumped ISO instead.
Editing it with lightroom
Taking a photo into Lightroom is always one of my favourite parts of the process. People often get dismayed when they import their raw files and find they look flat and boring. It can be annoying, but it is the whole point of shooting raw. Raw files allow you to pull more out of the shadows and highlights. To do that it has to keep all that information in there. A raw file isn't really a image file at all. It has so much information that it can't all end up in the final image. It can't make assumptions about what should and shouldn't be there so until it's processed, the logical way to display that raw file is as a flat image.

Contrast
The first thing I do to all my photos is add a bit of contrast. This helps me see what's going on a bit better. Generally speaking, if I don't already know, this step will reveal how I'd like to edit the image.
Straighten
The wonkiness of the horizon was bugging me so my next step is to grab the Straighten Tool and fix that. I also applied Lens Profile Corrections to remove any distortion there.