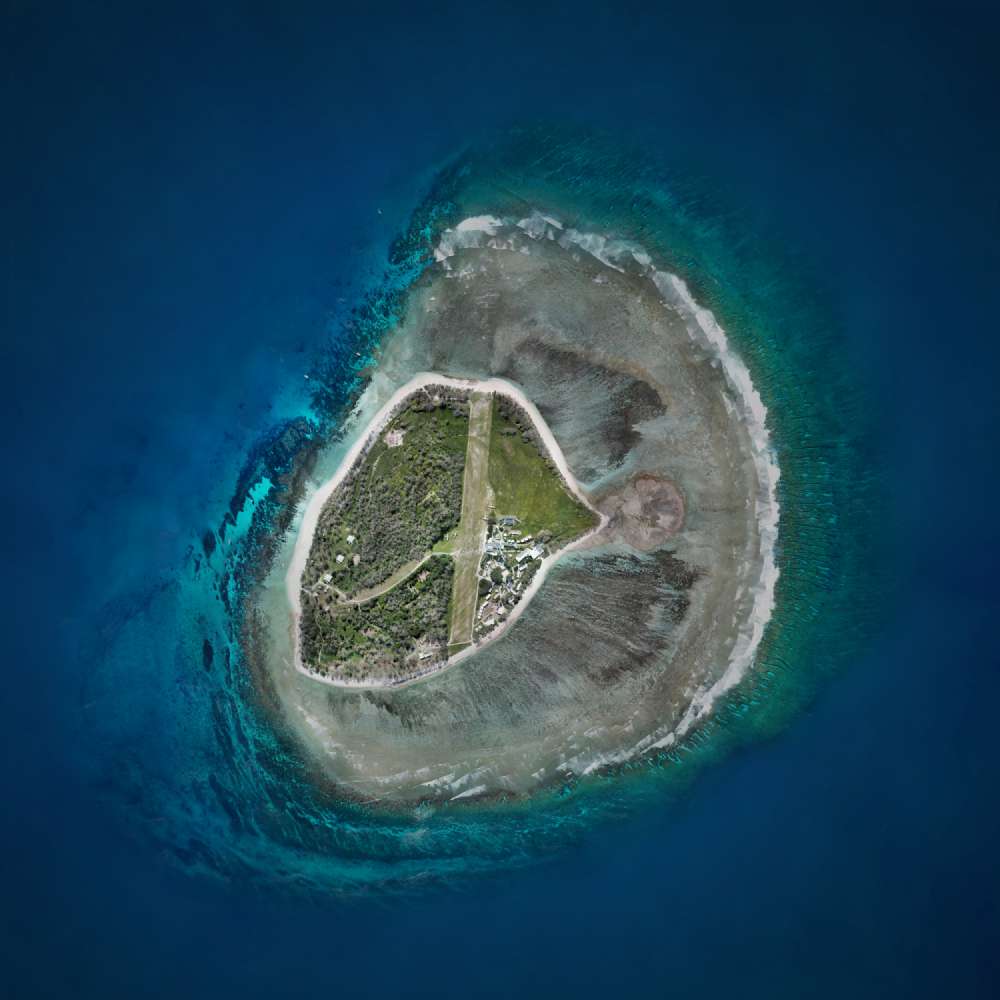
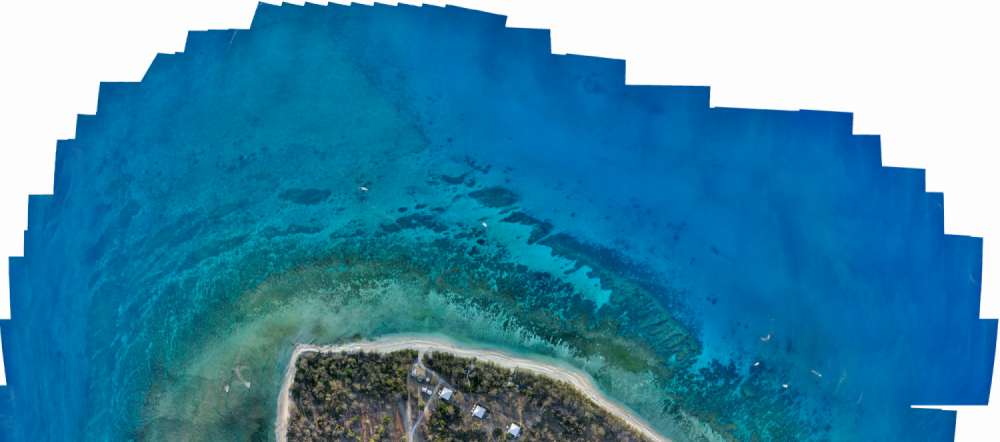
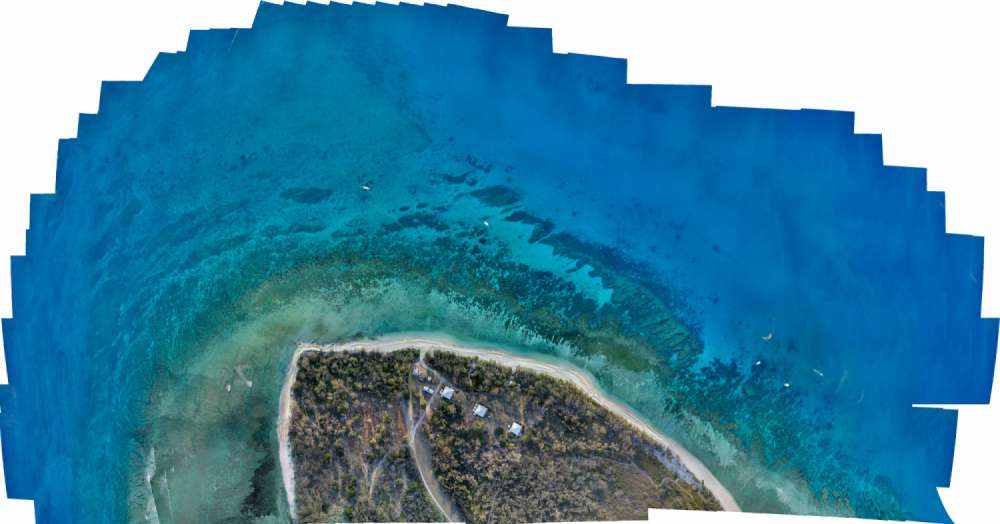
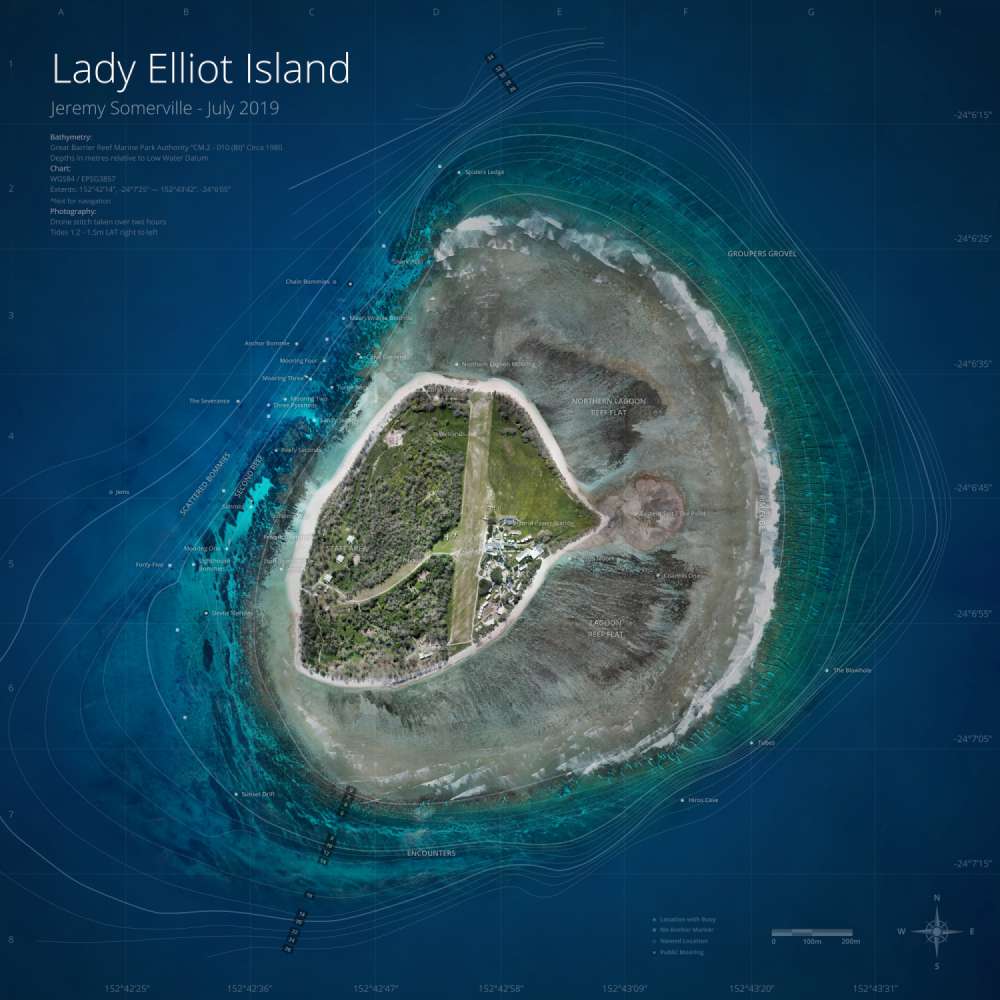
This photo is a little different to most. It looks like a satellite image but it's not. It's not taken from a plane or a helicopter and if you're thinking this looks far too high for any consumer drone to achieve you'd be right. Except that's exactly what was used to capture it. The final image is a whopping 1.024 gigapixels and made up of over 1000 individual images. Have you ever wondered how to make a gigapixel drone mosaic? Read on to find out how I did it.
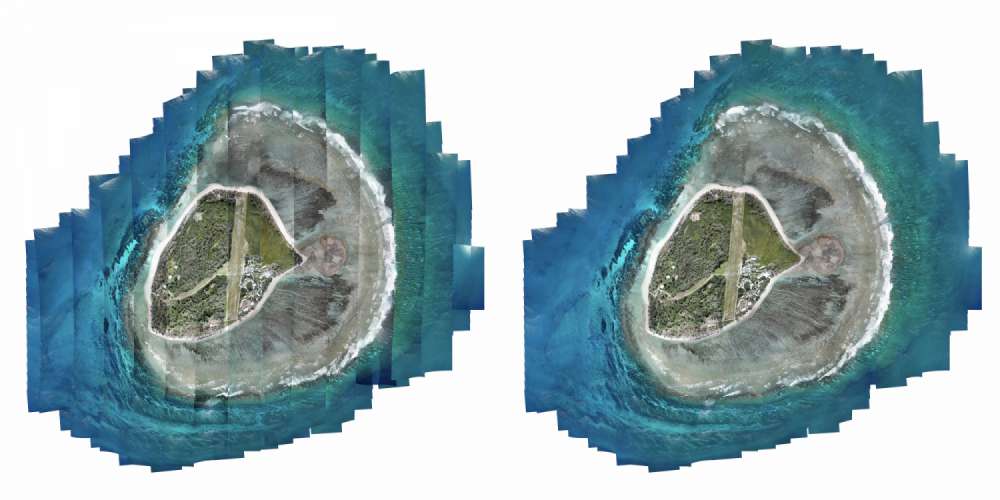
The island you see here is called Lady Elliot Island. It's the southernmost island of the Great Barrier Reef in Queensland, Australia. For the last two and a half years I've been working on the island in a variety of different roles and in my spare time I've gone out and taken photos. I've experienced some pretty incredible things in the water around the island and I've snapped a metric bucketload of photos. Of all those images though, this one is probably my favourite. Maybe that's because it's an image over a year in the making, or perhaps it's because I had to develop the technique myself, or maybe it's because it just looks so damn cool. Probably all of the above.
Why Did I Do It?
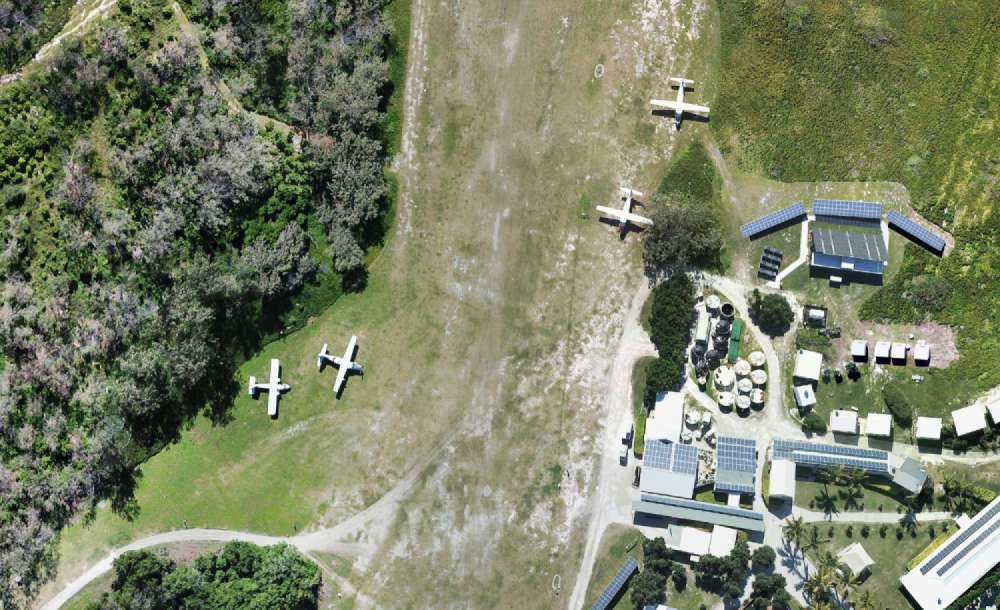
Pretty much the only way to get to the island is to fly there, hence the airstrip you see running through the center of the island. For two years I was flying to and from the island twice a fortnight so you'd think that's where I got the idea from, but that's not the case. I actually got the idea for doing this photo while scuba diving.
You see the island has a whole bunch of named dive sites, underwater points-of-interest and interesting formations but if you only ever see it from ground level (or water level), it's very difficult to get a firm idea of how to get from one place to another. I went in the water almost every day and still it wasn't until this map was finished that I could finally wrap my head around it.
There existed plenty of aerial images of the island, but they all had their problems. The maps that were being used to show reef locations were woefully inaccurate, sometimes with markers placed hundreds of metres from their actual location. Every dive map I had seen of the island was using an image that was taken from a seriously oblique angle and you could barely see what was beneath the surface.
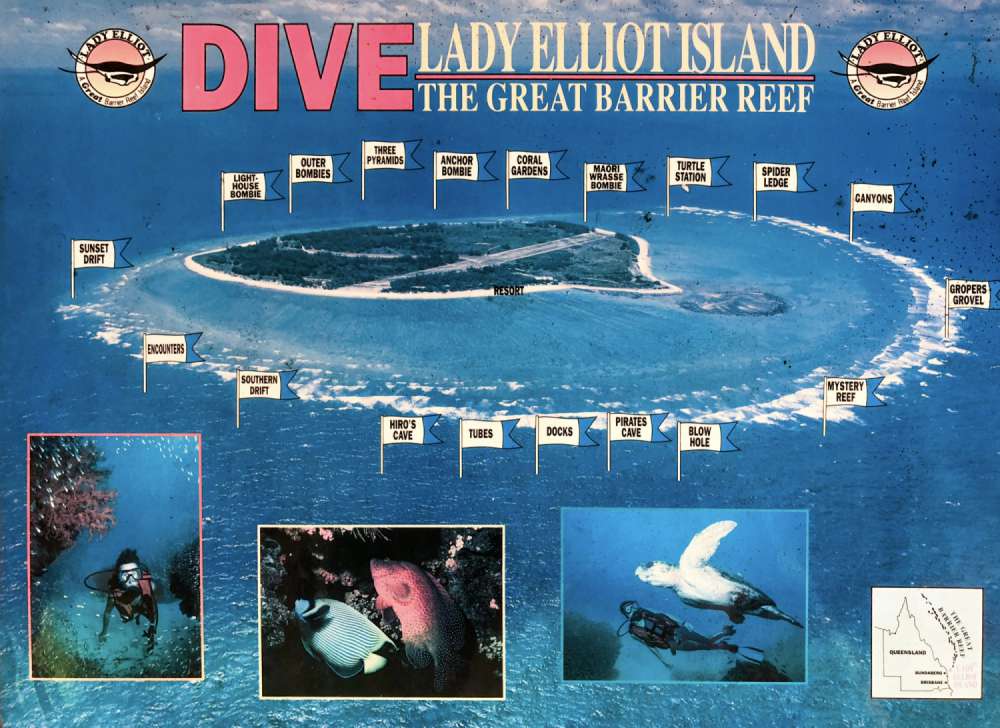
Part of diver training is being able to produce underwater maps of a dive site and I had seen a couple of hand drawn maps of small areas and I thought to myself, "Wouldn't it be really cool to have a map of the whole reef on the western side of the island". I knew I couldn't hand draw it from scuba diving alone, it was far too large an area to cover accurately. So I had the thought of using my drone to help me out.
Planning Process
There was a long period before I tried to do it. It was an idea I thought could look cool but I honestly never really believed it would look good enough for what I wanted. I wanted a functional map, but I also wanted it to look pretty and I just didn't think it was going to turn out that way. I had done a bit of drone flying around the island in the afternoons (when I wasn't snorkelling) but I felt that the surface of the water was always going to be a problem when it came to stitching anything together so I delayed doing it for a long time. I just went snorkelling instead.
Even though I didn't expect it to work, I had done a bit of research on drone mapping and had discovered the existence of apps like DroneDeploy which automates the flight and photo taking process and then can stitch them together. Basically you choose an area, DroneDeploy breaks it up into runs and then the drone flies up and down capturing photos at a regular interval.
With DroneDeploy, the app that controls the drone is free but the process with which stitches them together into a photogrametric map was quite costly - especially at the size I wanted. I had a very limited budget so that just wasn't going to work for me. In any case, I decided that using the app would be ideal because it was free, and then I would work out how to stitch the photos together later.
One day in October 2018, the water was a really calm. No wind at all. The ocean had turned into one big mirror. I decided to stick my drone up in the air and give it a go. After taking photos of about a quarter of the island, I went through the normal process of sticking them on my computer and then I started stitching them together. Honestly I was blown away with the result. It was so much better than I ever could have predicted. I was having some trouble working out the best way to stitch them, but I could see what was possible and it was really exciting. I even discovered a part of the reef that nobody seemed to know anything about.

The further I went through the stitch, the more problems I was running into. I found that the different runs weren't really lining up properly and I was trying to manually distort the photos to line up. Pain in the bum and frankly didn't work at all. Distortion towards the edges just kept getting worse.
So what did I do? I went out the next day to take photos of the rest of island. That's when I starting running into serious problems. The actual process of taking the photos worked well, but when I went to start stitching them into the photos from the day before I noticed that not everything lined up quite so well. The clouds were different and the tides were different.
The tide doesn't change much every day, but it was enough to throw out the shoreline. The island has a large lagoon surrounding it that empties at low tide and fills at high tide. As you can imagine this area looks very different depending on the whether or not there is water inside of it. I just so happened to do my drone flying on the half tide. This meant that the lagoon was full on the first day but empty on the second. There was just no way I was going to get a good stitch there.
The Waiting Game
It became pretty clear to me that the tide was going to be an important factor. I had already considered other weather factors such as time of day and angle of the sun but clearly this was going to be a bit more of a challenge than it first appeared.
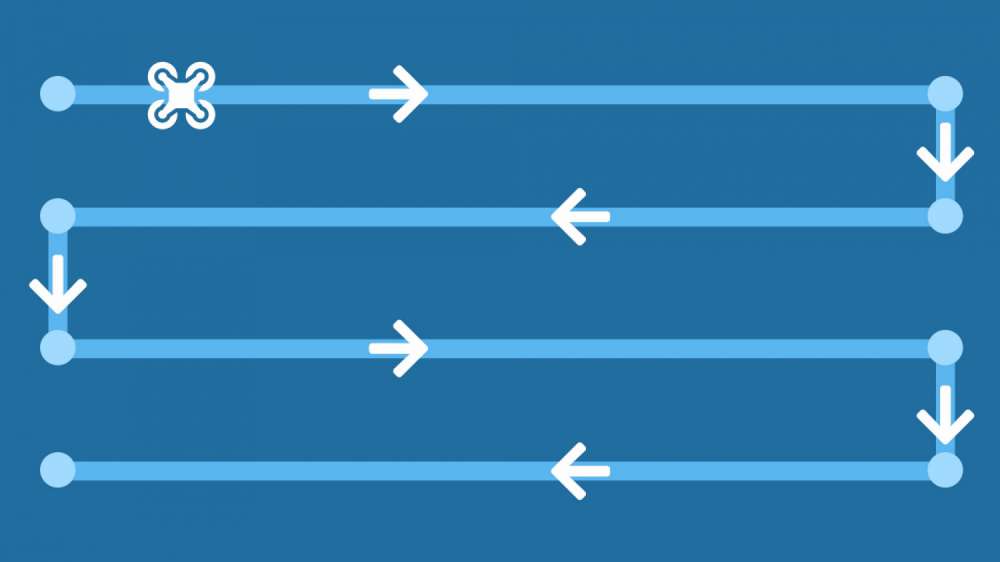
After a lot of thought I decided that to make this photo work for the entire island, I had to do the whole flight at once. This raised some issues. Firstly it was going to take several hours of flight time to capture the whole island. This was problematic for two reasons. Everyday I was on the island, I was working and this meant that I actually didn't have that much free time in daylight hours. It's also an active airstrip for most of the day so there's a limited period I was allowed to fly the drone.
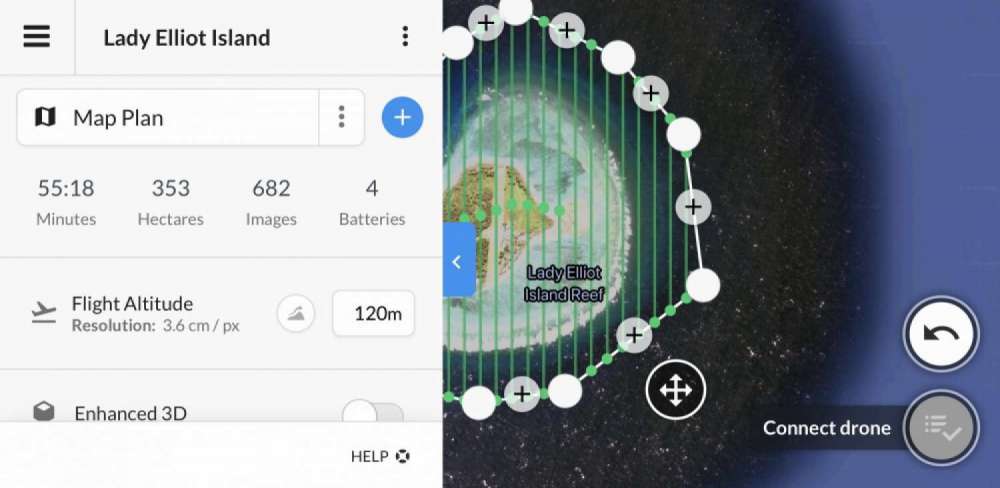
The second problem was I definitely didn't have enough batteries to do it all at once. I bought some more batteries and adjusted the parameters of the flight so that it was flying as high as I was legally allowed to (120m), and the overlap between runs was smaller (50% both horizontally and vertically). This brought the flight time down to about 2 hours (which I figured I could just make work given the daylight hours in summer). In the end I had about seven batteries for this flight time which was enough to do it comfortably.
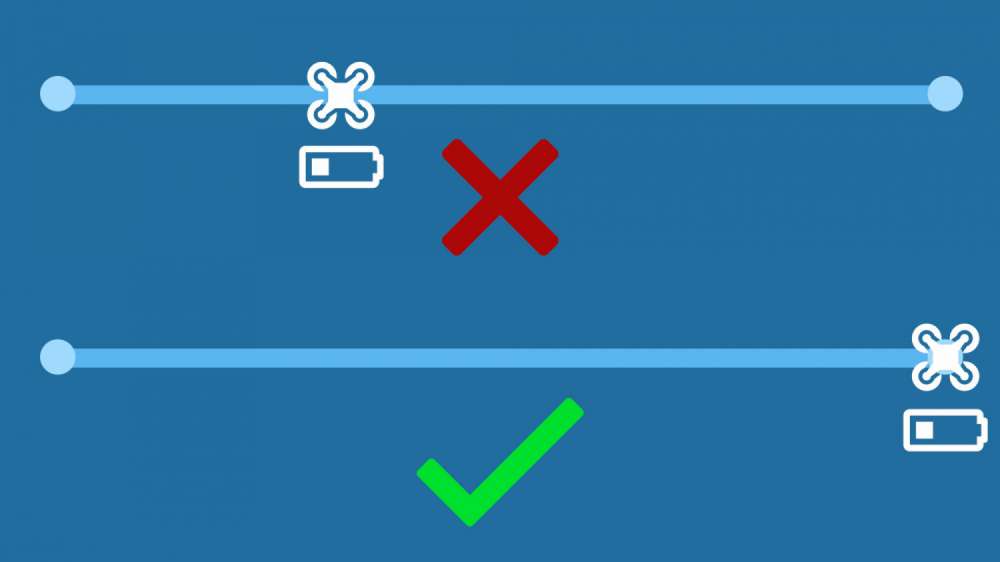
The area I wanted to map was large (about 350 hectares). The individual runs (up or down) by the drone were quite long and meant that the drone had to be over water for a long time. The drone could easily burn through 20% in battery just getting back to the center of the island from one of the outer edges. The app only considered a run completed if it makes it from one end to the other. This meant that I had to watch the drone battery carefully and estimate how much battery would be chewed up on a run to avoid having to ditch during the middle of a run. I had to be a little conservative with my batteries and this is the reason I needed as many as I did.
N.B. The DroneDeploy app has since been updated to allow for waypoints in the middle of long runs so this is less of an issue.
I did a lot of practice runs and trials to test different methods. Once I was happy with what I was going to do, I just had to wait for the weather to be right. For that I needed quite a ridiculous number of things to line up.
Wind
Summer on the Great Barrier Reef is cyclone season. Sure, it's not like there's always a cyclone hanging around, but it's pretty much always windy. There aren't many days that are still. At least not in the 2018/2019 summer. Winter is better but I needed it to be really still for at least a few hours.
Swell
I needed there to be only a small amount of swell. Any extra waviness (technical term) would cause problems with the sun reflecting in strange ways. This reduces the visibility in the water and could make the stitch harder to complete.
Visibility
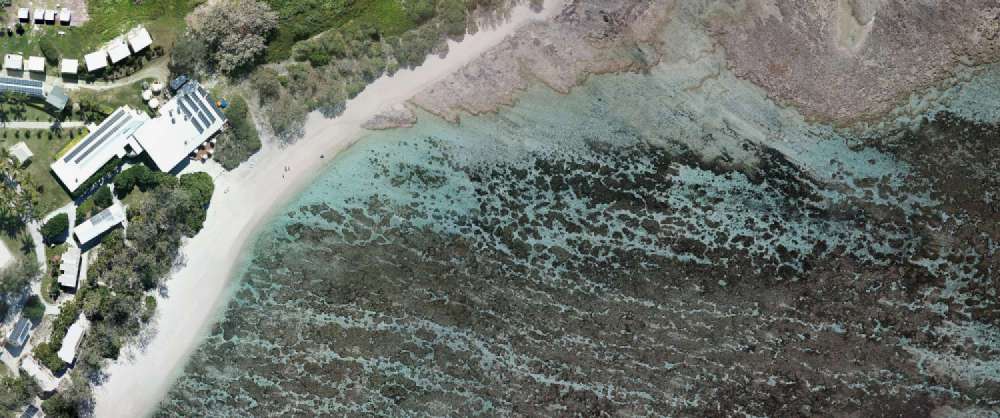
The other thing that had to be considered was the visibility in the water. Remember the purpose of the map is to see into the water and map the reef below. Visibility is very variable. Lady Elliot enjoys good visibility for most of the year. It definitely drops off in summer though. More algae, higher rainfall just means more particulates in the water. Some days you simply can't see the bottom at all. I wanted to make sure you could clearly make out the Jems (colloquially "Jezzas Bommies") in the deep water on the western side. This would increase the chance of finding other unknown places. It just makes sense to wait until the visibility is good. The problem with visibility though is that it's kind of delayed response to wind, swell, current, tide and rain. This means that even if the everything else is good, the visibility might be shot for days still.
Angle of the Sun
If you are taking photos of water from directly above, and the sun is also directly above, then you are going to get a lot of reflection. In summer, the sun is almost directly overhead at noon which means that I had to wait until the afternoon to fly the drone. This worked well around my work hours anyway.
Tide
I briefly touched on the tide problems before. Doing the whole island was just not going to work around the half tide. Way too much water movement and the lagoon could change drastically in a short amount of time. This means that the best time to do any drone flying was going to be around the peak of the high or low tide when there is as little water movement as possible. I decided to fly at high tide because it's a little more consistent in it's look and it I think the island is prettier at high tide anyway.
Cloud Cover
There had to be 0% cloud cover. Absolutely none for at least 2 hours. This was tricky as well. Even on gorgeous sunny days there is quite often a little cloud that'll pass in front of the sun for a few seconds. That alone would be enough to ruin part of the image. I had to wait for a day with nothing but blue sky all around. Rarer than you'd think. Fun fact: Did you know cloud cover is measured in something called Otkas? You divide the sky into eighths and cram all the clouds into as few of segments as possible.
When the Weather Got Good
Basically never happened. At least not when I had free time. I waited for months across summer for the weather to be right and it just didn't come. One of the windiest summers I had experienced on the island. The universe telling me something? I don't think so. It just means I had to wait a little longer.
Replanning
I was a bit disappointed, I didn't want to have to wait until the next summer to make it work so I rejigged my plan a little bit. I decided to give it a go in winter. This meant I had to look at the weather forecasts in advance and reschedule my work to get some time off in the middle of the day. I guestimated the angle I needed the sun to be at in order to get minimal reflection. I had to keep adjusting my plan as the days got shorter and the sun moved further north. By the time the right conditions came around, it was right around the shortest day of the year. It meant that I could do the drone flying exactly at noon.
Drone Flight
So many times the forecast looked promising, only to fall apart at the last moment. Then one day it all came together. July 2019, some 9 months after my first attempt.
The drone flight went off pretty well without a hitch. I had to work around the flights coming and going for obvious reasons. If you're wondering, I had permission to do so, and I maintained contact with air traffic control via radio the whole time I was doing it.

I was lucky, I just got my two hour window. It was surprisingly exhausting. I had to keep walking around the island so I could keep visual line-of-sight with the drone (which is why I exist more than once in the final image).
Stitching It Together
After literally months of planning, replanning, test runs and waiting I finally got my images. Now I had a collection of over a thousand images and the hard task of stitching them together. I still didn't want to spend the money on the DroneDeploy software so I used Photoshop instead.
The technique to properly stitch the photos together took quite a bit of trial and error. I tried a number of different ways before I found one that worked really well.
Mosaicing With Parallax
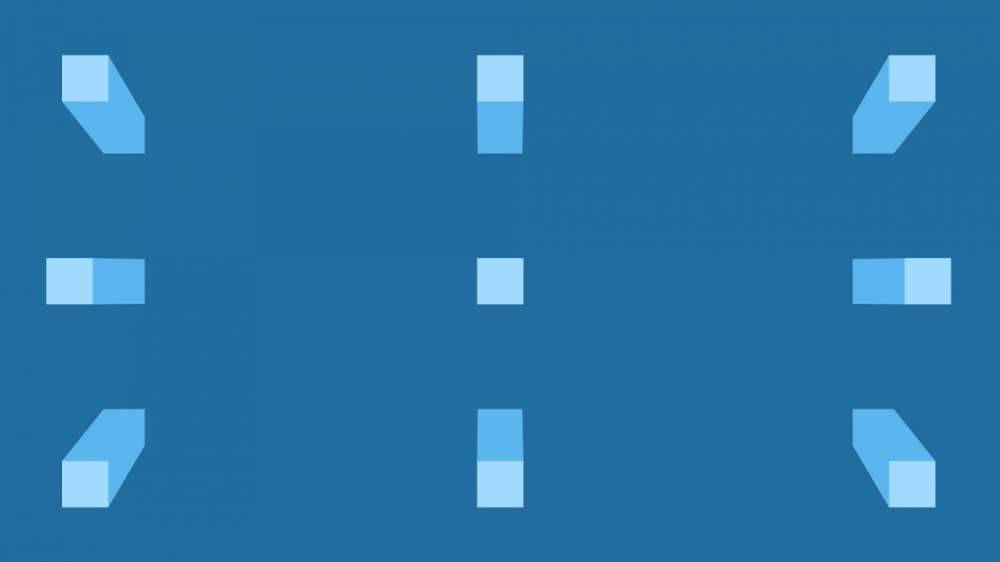
I initially tried getting photoshop to auto align the images for me, but it simply couldn't handle doing that. Not even parts of single runs at a time. I don't precisely know why. I assume it has something to do with the parallax error in every single photograph. You see a normal panorama stitch only has a little bit of distortion to worry about, the camera doesn't move from it's position, only it's angle. It's the other way around for a drone mosaic. The camera moves but the angle stays the same.
For this reason I resorted to manually aligning images in photoshop. To line up two photos I would simply make one of them 50% opacity and slide it around until things lined up.
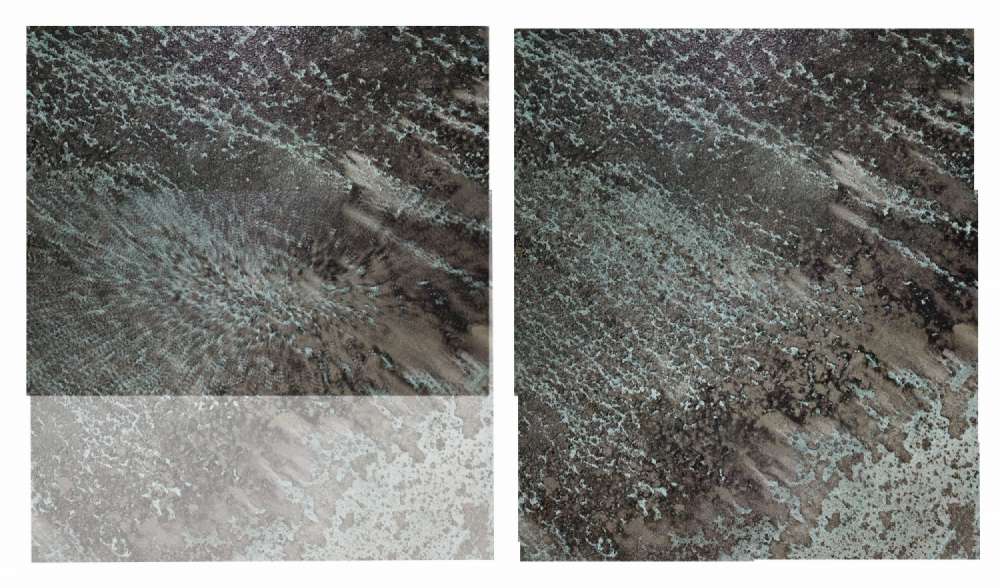
But there's a big problem. Parallax.
If you try to align just two images together, you'll find there is no place where the objects all line up. You can line up one side pretty well, but then other side will be out. And by quite a lot.
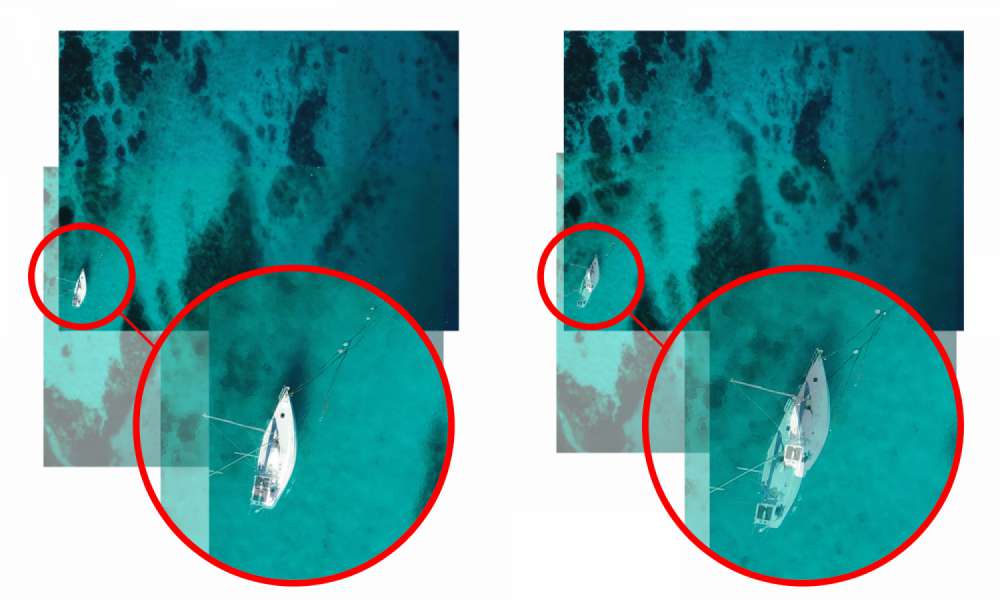
The errors in the example above accumulate if you are inconsistent with the positioning of your images. By the end of a single run, you can end up with objects being hundreds of metres away from where they are supposed to be.
Imagine making a 100m running track by painting 1m sections of a single lane at a time and without measuring. Sure you might be able to guess 1m pretty closely but you're probably not going to be perfect and over time those tiny errors add up. By the end, you've got yourself a 100m lane that is nowhere near 100m long. It could be 92m or 114m. Then you move over to the next lane. If you use the same technique you'll end up with two lanes that aren't 100m long and aren't even the same length.
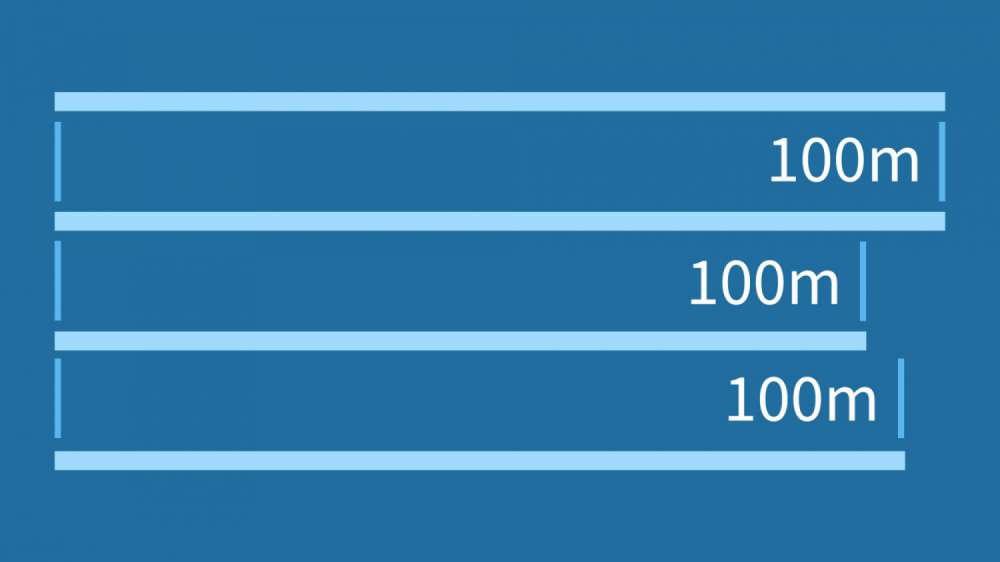
It's exactly the same here. You have to 'paint' these photos one at a time. If you paint them in the wrong spot, you get the wrong length. When you move on to the next row and do the same thing. Rows just won't line up. It's inaccurate and inconsistent. This is the reason I was having trouble with my earlier stitching.
The main difference between my running track analogy and the drone situation is that I can stretch my drone image later if I need to. If you think about it, this means that if I can remove the inconsistency problem between rows, I can always stretch my stitched photo (running track) to the right length when it's finished. If I stick with this 100 metre track analogy, this would be the similar to making a track where all the lanes are the same length. It doesn't matter how long they are, only that they are the same. Once you've done that you stretch them all until they are 100m long. Hard with a race track, easy with a digital photo.
The most obvious solution to this problem is to simply align the first two photos. Measure how far apart they are (e.g. 100 pixels) and then position every other photo exactly the same distance apart after that. That sounds like it would remove the inconsistency problem. Except it doesn't. Unfortunately it assumes that the images were taken at exactly equal intervals. They actually vary slightly. It's like using a measuring stick that changes in accuracy as you use it. What you need is a variable measuring stick.
Consistent Photo Positioning
The technique I've developed for stitching these parallax-riddled photos together all comes to the idea of this variable measuring stick. How do I make sure that the rows (lanes) all end up the right length? The answer is to use the parallax to my advantage.
You see it's all about where you put the parallax vanishing point. Overlay your two images and instead of trying to line up a particular object, or use an exact distance, just line up the overlap in a photo-dependant way. You want the center-of-overlap of both images to line up. When you get close to the right spot you'll see a weird effect take place. A strange pattern appears. It looks very similar to what you might get with zoom blur. It's like everything in the overlap is 'zooming' towards a point.
This is what I describe as the parallax vanishing point.
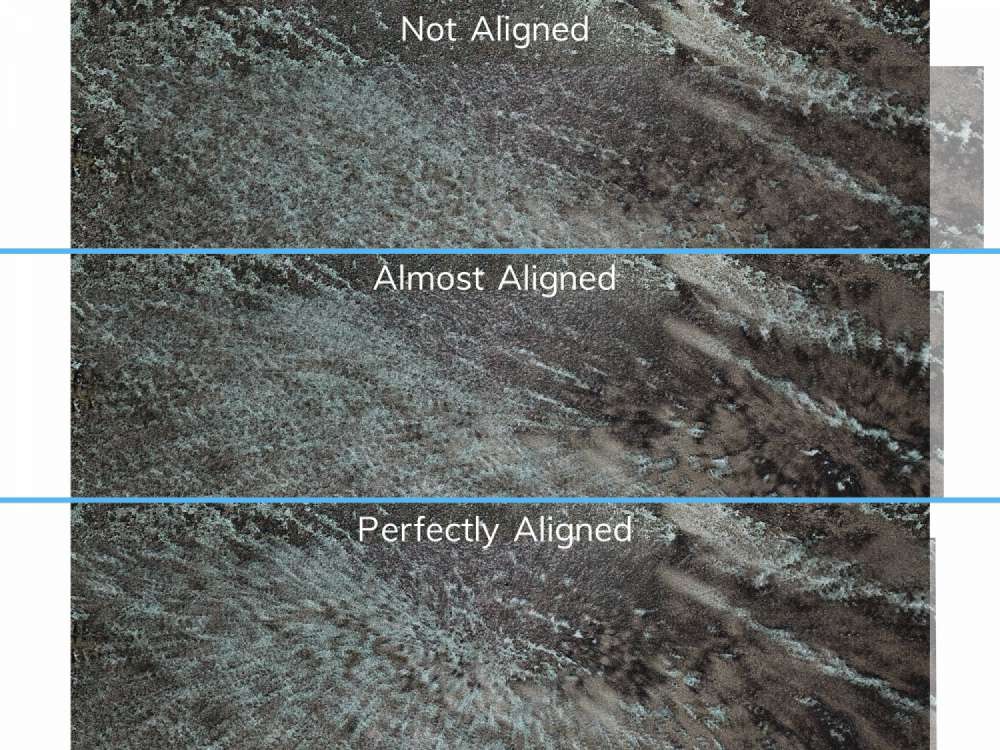
This strange effect is the center of an interference pattern caused by the superposition of the slightly different individual images. I noticed in my process that the easiest photos to align were those with strong patterns like the reef lagoon. This is where the effect is most noticeable.
You want to line up the images so that the vanishing point is centered in the overlap. While not perfect, this minimises the inconsistency problem drastically. I believe there are still theoretical errors using this technique but it apparently minimises them to the point where they are negligible. Certainly good enough for the blending process to do it's magic.
Colour and Exposure
After getting a single row aligned correctly, the next part of the process is to colour correct and fix the exposure of the shots. The drone flying process is great but I noticed that flying over water and land constantly, the changes in brightness were messing with it's white balance and exposure settings. You can set the exposure manually, but not the white balance. This means that some photos turned out really green and others really blue. I picked out the problem images and just add a quick colour balance to them and any levels adjustment needed to give the row a consistent exposure and colour. It's an annoying part of the process but it really makes the overall result so much better.
One problem I didn't consider until I got to the end was the effect of vignetting. Obviously the drone lens has a certain amount of vignetting and like an idiot I forgot to correct it before I started aligning everything. I actually finished the entire thing and blended it and then I found I had all these dark lines running parallel with the drone runs up and down the image. I ended up throwing a levels adjustment on each row (with a gradient mask) to remove the single-dimension of vignetting that remained before blending again. It took a bit of trial and error but I got it there in the end.
Blending the Row
With the colour correction done, it's time to blend the row together. Select all the layers and use the Auto-Blend Layers function in photoshop. I have no idea how it works under the hood but I'll tell you, it's pure magic. It looks unreal!

Blending the Image
After completing each run I then used the same technique to join the strips together. It's a bit harder at this step and it took me a few attempts to get everything aligned in the right spot but worth taking the time.
Every part of this process takes time. My computer is over five years old. Even saving the file would take about 20 mins. Blending the rows could take half an hour and I had to have an external hard drive plugged in to my laptop the whole time to use as a scratch disk. I saw photshop use 800 gigabytes at one point!
Fixing It Up
At this point I had something that looked pretty bloody good. The stitch was actually fantastic, there were a couple of errors scattered through there but they were easy enough to fix up by just grabbing the original images and blending them in manually over the top.
The biggest thing that I wanted to deal with at this point was the edge of the mosaic. I knew I wanted the final image to be square. So I duplicated my stitch layer and used a combination of content-aware fills, cloning and blurring to create a background that matched the outer edges of the stitch itself.
It's probably worth noting here that I designed the actual drone flight path to go right to the edges of the visible reef. As you start to head over deeper water, with little reef beneath it, every image is just an image of the same thing. Blue water. There's no sense taking the drone further unless you're running an exploratory operation.
For example I know there is an interesting chevron shape reef further down and to the left of the final crop but it's such a long way away from the island (probably an additonal kilometre away) that my drone would probably be struggling to complete the task and would've made the flight time impossible to achieve in one go. I chose not to include it. I made the drone flying area as small as I could to minimise the flight time. I was always planning on 'filling' the square in post production.
With that background created, I grabbed a mask and brush and blended them together to soften the join and hide any square edges. I added colour shift and vignette to the water to more accurately match what you would see with the naked eye. It's quite helpful that visibility naturally falls off as you move away from the island, and into deeper water.
Georeferencing
Remember the running track from before? This is the part where we stretch the image so that the 100m track is actually 100 metres long. Not only that, but it accurately transforms the image so that it aligns with real map coordinates (like latitude and longitude). This process basically involves clicking on parts of the image and typing in it's known coordinates in a GIS program (QGIS). Luckily for me, each individual drone shot comes with an embedded GPS mark. It's not good enough for alignment of images (it lags a little behind the actual drone position) but because every second drone run is done in the opposite direction, the errors cancel each other out and it ends up working really well for georeferencing. The more GPS marks I use for the georeferencing, the better the transform is going to be.
With that done, I have a georeferenced gigapixel drone mosaic map!
Error Chat
Yes, there are errors. They occur at pretty much every point in the process although hopefully they are minimised as much as possible. I have no idea what the error value actually is. The nature of this kind of drone stitch means that errors are worse on the small scale than they are on the large scale. What I mean by that is individual objects (points-of-interest) might jiggle around a little bit from where they are in reality. This jiggling is everywhere and basically random but it isn't cumulative. This means the errors are practically removed over larger distances. You could measure the length of the island and be pretty confident in the answer. You can't do that with the distance between two trees that are close together.
I've done a bit of walking around the island marking some GPS points to ground truth the image and from what I can tell it's pretty good.
In some ways a drone mosaic can be more accurate than a satellite image, especially in the water surrounding the island. Pull up any satellite image of the island you can find, and look at the lighthouse on the left western side. It's leaning. Of course it's not actually leaning, it's just the angle the satellite took the photo from makes it look like that. Objects at ground level are in the right place. The tops of tall buildings however get shifted out of position. That doesn't matter that much on an island with basically only one tall building. It does matter in the water.
The reef surrounding the island ranges from 0 metres dropping off to around 30 metres in the immediate vicinity of the island. This is effectively a negatively tall building. This means in that same satellite image I was talking about, objects on the seafloor appear out of position. These objects can be out of position by as much as 40 metres.
That particular error is effectively elliminated by the drone moving around and capturing objects from directly above. Any buildings that appear to lean are just unlucky with the way the drone flew over them. It doesn't affect large areas. In fact it all could be entirely eliminated by increasing the overlap between shots at the cost of increased drone flight time.
I'd love to say that my final georeferenced image is within 5m of accuracy. For the most part I'd betcha it would be, but there are possibly parts that aren't that accurate so I would put accuracy of the whole thing at something like 10 metres.
Adding Extras
I'm really proud of this image and I thought it looked amazing as a photograph. If you remember though, I wanted this image to also work as a map (hence the georeferencing) and that means placing labels on the image.
I spent a lot of time zooming in and around on the map finding the various buoys (some of them are tiny), mooring blocks and marking other points-of-interest on and around the island. I also found some old bathymetric data (underground depth map), vectorised it and superimposed it on the image.
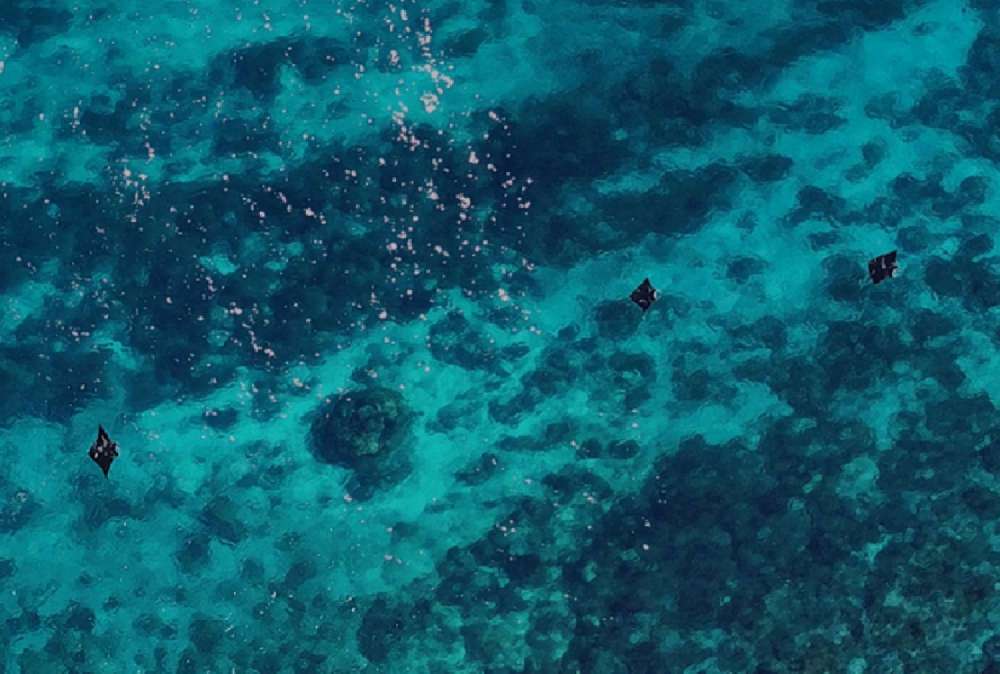
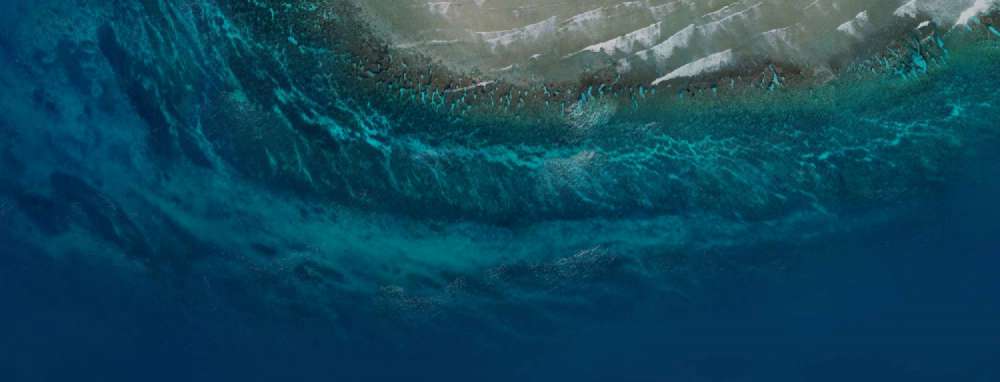
It's really interesting looking at the bathymetric gradients around the island, especially while being able to see the reef below. The "Jems" or "Jezzas Bommies" far out on the western side of the island are particularly interesting to anyone who has spent a bit of time on the island. They are almost-never visible from the air, and there is nobody that I know who has actually been there to check it out. The reef structure there looks quite extensive and I'd love to know what creatures hang out there. It's just too far out. It's basically twice the distance from shore to the lighthouse bommies (which is probably the best dive site on the island). Anecdotally, we have seen manta rays on the surface there. Perhaps it's one of their unknown hideouts.
There are scientific benefits as well. Producing more of these maps will allow scientists to track coral cover and health over time and also demonstrate the way the shape of the island is changing over time. You can actually see how the island formed from this aerial photo and I think that is pretty cool. Plus it's even useful as a base map.
I could probably write a book on my experiences on Lady Elliot Island and where the best places are so I will leave that for another time.
Adding all this information in gave me the following result.
Exploring the Image
I've spent a lot of time exploring the image. It's a lot of fun. Obviously I have a deep connection with the place to start with (which helps) but it's just very cool to see the detail in the reef and to be able to understand how it all works together.
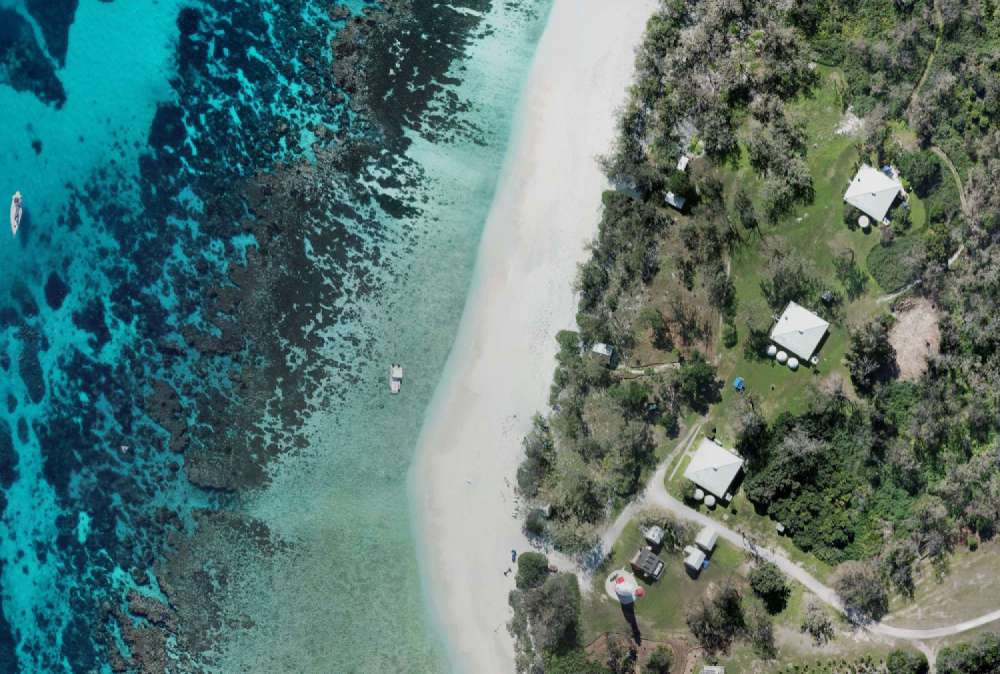
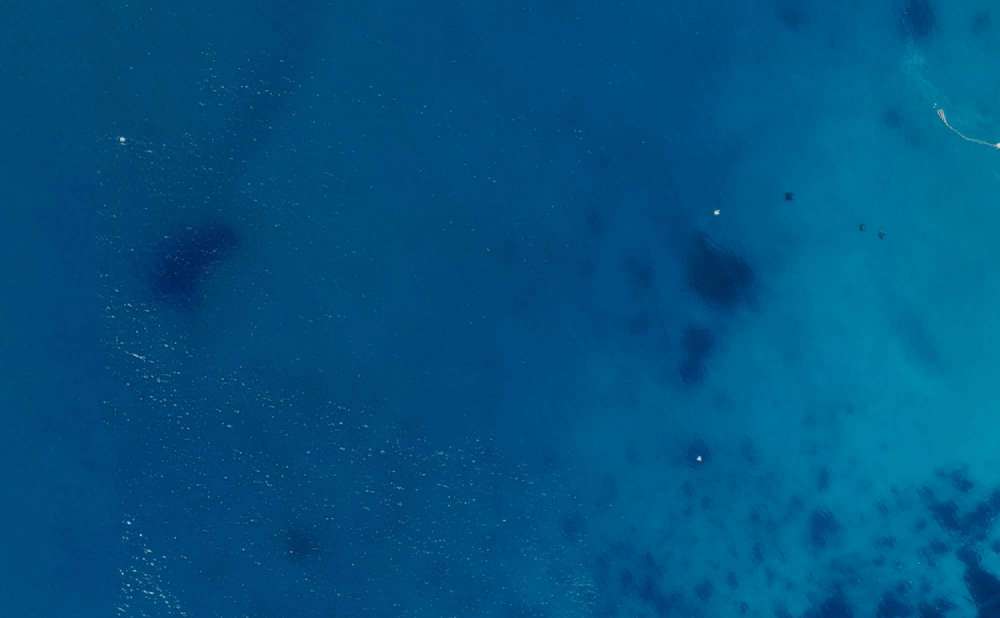
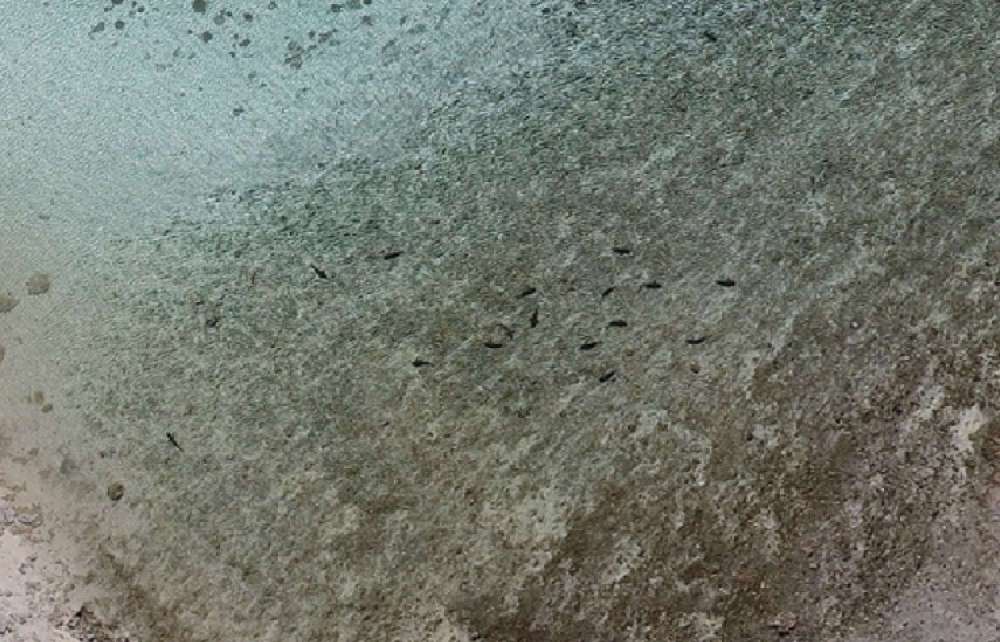
If you dive deep enough (hehe), you'll find all sorts of different animals scattered through the image. Here's a few of my favourite grabs from close up. Keep in mind that some of them are rotated.

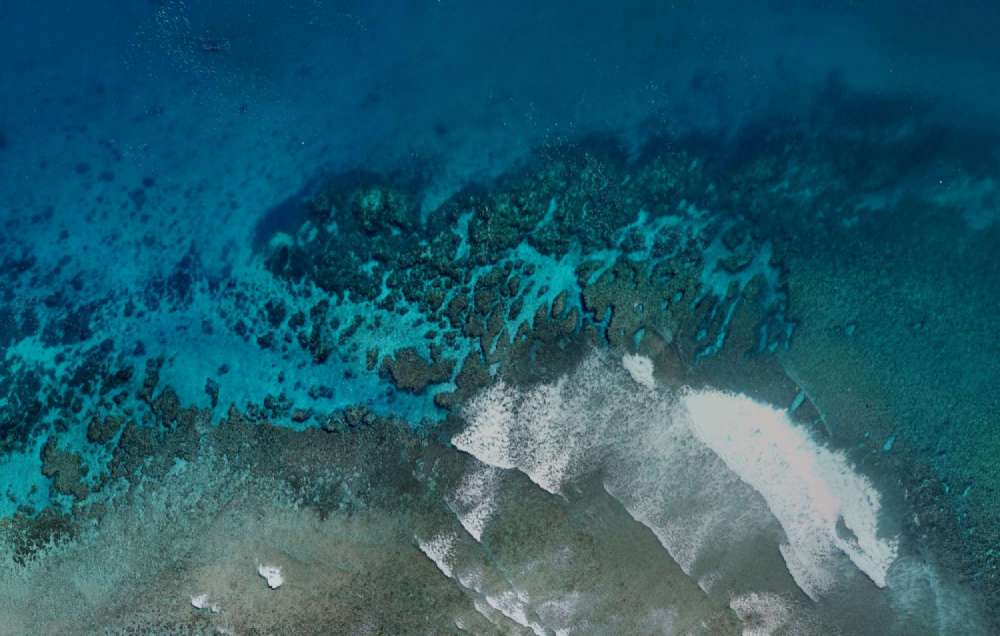
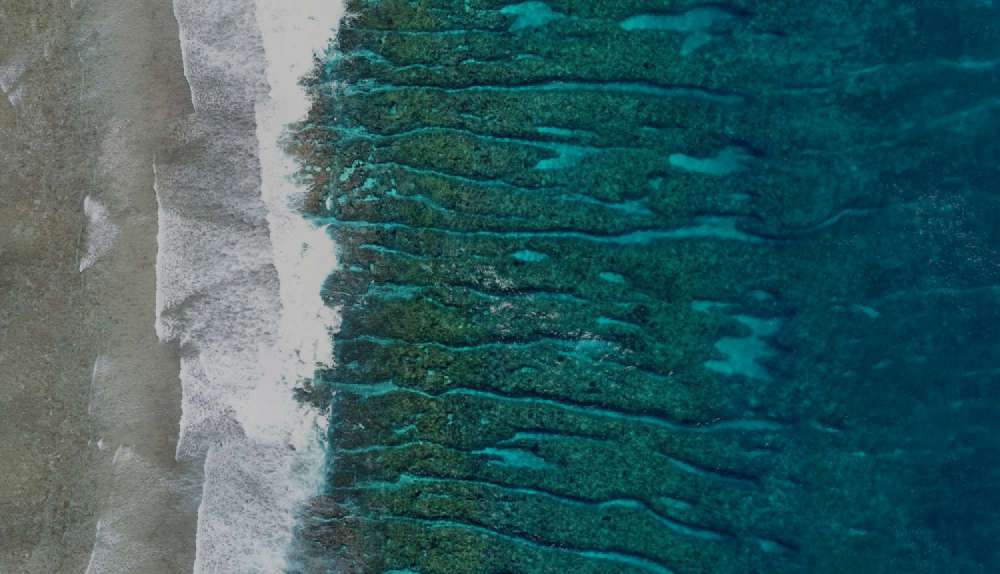
Spur and Groove reef structures These are formed and reinforced by the way water moves in and out from the island. Water arrives on the spurs and exits through the grooves. They get longer based on where the island gets the worst wind and swell.
Thanks for Reading
This project is something that is really close to me and I'm super pleased with the final result. It took many hours of drone flying; hundreds of hours learning, post-processing, developing the technique & waiting for the computer to think; and many more hours adding extra information. And now I can't wait to do it all again! If you're interested in taking advantage of the skills I've developed during this process or would like to purchase a license for the use of this gigapixel image, feel free to drop me an email.
I'll leave you with this just one more time: